Saturday, April 30, 2011

Desks and Tables for the "Almost Finished" Room!


We have many different design options at 
Abigail Fox Designs.
One of them is a for your "Almost Finished" rooms!

We have may customers who are just looking for specific pieces for a room that is already "designed" but missing a few items. We love looking for unique furniture to fit these spaces. Below are some examples of pieces we can order for you to help pull together your "Almost Finished" room!


Please email or call us if you have any questions regarding our design services, or with specific questions on the pieces below. This is just a sample of some small tables and consoles we love:


203 344 1707 or send us an email abigailfoxdesigns@gmail.com

Almost Finished Room design

We have many different design options at 
Abigail Fox Designs.
One of them is a for your "Almost Finished" rooms!

We have may customers who are just looking for specific pieces for a room that is already "designed" but missing a few items. We love looking for unique furniture to fit these spaces. Below are some examples of pieces we can order for you to help pull together your "Almost Finished" room!


Please email or call us if you have any questions regarding our design services, or with specific questions on the pieces below. This is just a sample of some small tables and consoles we love:


203 344 1707 or send us an email abigailfoxdesigns@gmail.com
  

Bamboo Side Table
Distressed Brown

Birch Wood
24 x 18 x 28H


Bamboo Open Shelf Side Table

Black
Birch Wood
28 x 20 x 30H


Colonial 2 Drawer Sofa Side Table

Distressed Black
Birch Wood
35 x 20 x 32H

Bamboo 2 Drawer Side Table
Distressed Brown
Birch Wood
42 X 22 X 30H

2 Drawer Side Table w/Sliding Tray

Hand-rubbed Black
Mahogany Wood
40 x 19.5 x 30H


Oxford 2 Drawer Side Table

White Wash
Mahogany Wood
28 x 20 x 30H

Dressers and Consoles
Bamboo Flat Screen Tv Console
Distressed Brown
Birch Wood
72 x 23 x 35H
Bamboo 7 Drawer Sideboard
Distressed Brown
Birch Wood
48 x 20 x 36H
Bamboo 2 Door Buffet
Black
Birch Wood
54 x 22 x 34H

Antique Glass Chest 
Mindi Wood/Grey Wash

46.5 x 22 x 36.5H
Dresser
Mahogany wood, Hand-rubbed finish

40 x 20.4 x 30H
Comles Sideboard
White Weathered

48" x 20" x 33" H

Upsala Dresser
White Weathered

36" x 18" x 32.5" H


 Dover Dresser
White Weathered

50" x 18.5" x 32.5" H

Wednesday, April 27, 2011

An Old Greenwich Cottage, blog by cococozy and design by Lauren Muse

There are so many great blogs out there that I love to read. Awhile before I started blogging, a couple friends forwarded me some of there favorite blogs, which are now some of my favorites as well. I love all the points of views and different perspectives people have on similar styles that I like. One of my favorites is called CoCo Cozy. Not only does she has a great blog, she also has her own line of home decor, pillows and throws that I fell in love with at the NY Gift show this past January.


Check out her blog, and her products, I bet it will become a favorite of yours as well! http://www.cococozy.com/


Today, "Coco" posted about a wonderful beach cottage in our very own little town of Old Greenwich! What a great surprise! I have attached the blog below as I know so many of my readers will love the design, and probably ever recognize the house! The blog content is all Coco and the Design is all by the talented Lauren Muse of Muse Interiors, also based in Greenwich. Take a look:


SEE THIS HOUSE: BEMUSED BY A BEACH COTTAGE IN OLD GREENWICH!


So...once again...saved by COCOCOZY readers!

Got an email yesterday from Lucy...Lucy works with talented designer Lauren Muse ofMuse Interiors in Greenwich, CT. Lucy was asking if she might submit some design photos from the Muse portfolio. I of course said yes...and to my surprise today...I received these wonderful photos in my inbox.

This is a 6,000 square foot "cottage" in the beach community of Old Greenwich. It has 5 bedrooms, 4 full bathrooms and 2 powder rooms. The home was newly built back in 2009. (P.S. I wish my cottage in the Hollywood Hills was 6000 square feet...instead it is only around 700 square feet and I'm probably being generous...jealousy about to set in...breathe...relax...no room for cottage envy in this post...okay...I've calmed myself...)

Lauren Muse and team had at making this "cottage" or large house into a fresh cozy space.  They succeeded!

My favorite rooms I think are the bedroom and the kitchen. Love the soft color palette used of light camels, light blues and whites used throughout the house. Lovely.  Am also loving the dining room wallpaper...and all of the drapery throughout the house.  So perfect for a beach abode!


Tuesday, April 26, 2011

Zebra Fabric, Tan/Beige or Gray... I love them both!

Well, the title pretty much says it all...
I pretty much love anything Zebra, and have for years. 
 I dont think I will be getting sick of it aytime soon.

This bathroom is from Southern Accents. 
I love the wallpaper. Although it is very subtle it is able to fill the room with so little color.
I love how the molding around it was painted in a grey to match the stripes.

Unless its tailored, I am not a fan of "skirted" anything. 
But I am a fan of this skirted sink found through pcbinteriors:


I like how the Zebra fabric is faded, and connects down the center seem.

So...What I am trying to decide on is curtains for my dining room. 
I have light grey walls, and I am trying to decide it I want grey Zebra Curtains. 

focusonflair
My dilemma is that I LOVE tan Zebra fabric that I use on everything, including many pillows and chairs in the store that I literally cant keep in stock...
(Like these vintage bamboo style chairs we had re covered... I LOVED these!!)

The tan wont work in my dining room because of the grey walls. 
BUT... 
The tan fabric WOULD WORK in a bedroom in my house that has Navy blue walls, mirrored side tables and cream/Ivory bed and bedding. 
Here's a picture of the fabric in curtains from Boxwood Designs:

So maybe I should save the Zebra for the bedroom and keep looking for the dining room...
And of course right when I make the decision to use the tan zebra in the bedroom I find these though from Betsy Burnham designs and love them with the grey accents...

Help me decide!!

While looking for "inspiration" I came across some great zebra decor, take a look:
lesliewilliamsinteriors
living rooms - white sofa modern slipper chairs walnut console table fireplace orange throw zebra bench gray walls sisal rug brown ribbon border trim French doors white cotton drapes black ribbon trim
decorpad
eclecticrevisited
decorpad
verdigrisvie
thehuntresslives

Saturday, April 23, 2011

Rainy Day Store Musings... #2 Time for coffee


PS: There is no X in Espresso

Rainy Day Store Musings: Encyclopedia Britannica

Rainy Day Store Musings:
#1. I wonder what happened to all the Encyclopedia Britannica's?


April Showers


I didnt know it was going to rain today. 


image from thisisnthappiness.com

Wednesday, April 13, 2011

Time to get personal...

I am excited to share that a new store has opened this week in 
Old Greenwich! paper + stitch opened this Tuesday on 
Sound Beach Ave. The owners, Victoria and Diana have joined forces, both having run their own companies for years. Victoria, designing beautiful stationery & paper goods, and Diana with amazing monograms on just about anything and everything you can think of!

paper + stitch is truly a breath of fresh air. Here is a sneak peek of all it has to offer, you're gonna love it!


So that's right... 
Its time to get personal!! Stop in and say hello, I promise, you will love them both, and all their personalized products!


Monday, April 11, 2011

Make your own valance by Nate Berkus & Easy Pelmet Boxes (never heard of a pelemt box? me neither...)


Two great D.I.O projects... 


Make Your Own Valance by Nate Berkus

Get the step-by-step guide to making your own affordable valance, even if you don't sew!

Get the step-by-step guide to making your own affordable valance, even if you don't sew!

What You Need
Wooden Valance
Staple Gun
Batting
Scissors
Fabric
Masking Tape
Acrylic Paint
Stencil brush

Directions

1. Purchase a wooden valance at your local hardware store. Measure the height and length of the valance. When measuring the length, include measurements for the sides as well as the face
2. Add two inches to each of these measurements, and cut batting to these measurements.
3.Wrap the batting around the valance. Using a heavy duty STAPLE GUN, attach batting to valance at the back side. Begin stapling at the center and work toward the ends. At the ends, it may be necessary to trim away some of the bulk created when folding and stapling the batting.


4. Add an inch to your batting measurements to the measurements of your fabric. Cut the fabric to size.


5. Staple the fabric to the valance in much the same way the batting was attached. Gently pull the fabric tight as you work. Turn your work over regularly to make sure there are no creases or puckers.

6. At the fabric ends, create neat "hospital" style corners and staple in place.


7. To create a design or stripe on the fabric valance, layout your pattern using masking tape. Remember that it is the blank area between the lengths of tape which will make up your design.  When you are satisfied with the design, make sure that the edges of the tape are smooth and adhered without gaps to the fabric. In the demonstration, the blue tape represents the area that will be painted, and the white tape is the temporary stencil for the pattern.


8. Use artists' acrylic paint because it's thick and has less tendency to "bleed" under the tape. Dip the stencil brush into the paint. Dab off excess paint, and cover the stenciled area. It is best to apply the first coat of paint very lightly. Be careful not to drip paint on other exposed areas of the valance.
9. After you've completed painting, allow at least an hour dry time. Repeat for a second coat. It may be necessary to apply a third coat.
10. Allow paint to dry entirely before removing the masking tape.

Easy Pelmet Boxes by http://littlegreennotebook.blogspot.com/2009/09/easy-pelmet-boxes.html

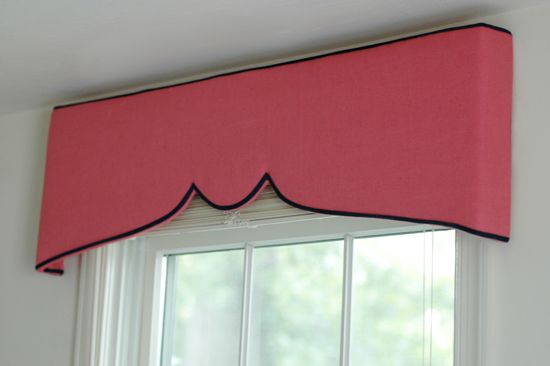
Many of you asked about the pink pelmet boxes in my girls' room and I’ve been so excited to share the mini-tutorial! It’s an easy and inexpensive one!


Two of the three windows in the bedroom were obstructed by furniture, so curtain panels (my default window treatment) weren’t really an option. I thought about transforming the mini-blinds into fabric shades, but I was really hoping to find a way to make a structured valence or pelmet box.


In the early planning stages, I was going to buy some plywood at Home Depot and use an electrical saw to cut out a fun design. That was intimidating for me though, and the price of the wood and a new saw (or a carpenter) was going to add up. Then I realized that I didn’t need anything fancy in this room – just something flat that could be cut easily and that was sturdy enough to hold up some batting and fabric.
Enter: foam core board.
I picked up three sheets at Michael’s for $1.99 each. I carefully drew one half of my pelmet shape on to the foam core, cut it out with a box cutter and used that piece as my template. I also cut some short pieces that would be my sides.

I had bought some L-brackets, screws, nuts and washers to assemble the corner pieces, but I ended up just duct taping the whole thing!! This project was SO easy!!

Duct tape holding the two halves together (above) and the side/corner pieces (below)

Then, using ¼” staples and my trusty PowerShot Pro, I upholstered the pelmets with some batting and pink linen left over from a client’s project. I ended up using only about a yard of fabric for all three pelmets.

After stapling, I used Fabri-tac to glue on ¼” navy blue bias tape as a top and bottom border.

I don’t have a photo of this step, but to hang the pelmets, I simply epoxied some wall hangers to the back of the foam core, and hung the boxes on the walls with nails.


And that’s it! It took me about two hours to do this project - from design conception to hanging the three pelmets. So fast and so easy!