


Check out this blog post from Emily of name5things.blogspot.com... She made over this Ikea Cabinet and it looks amazing... another great do it yourself project...
name5things.blogspot.com 's Cabinet Makeover:
(Please note this blog is original contact from name5things.blogspot.com)
Our office is currently a little lot on the bland side to say the least. I am trying to decide on a paint color for the walls (leaning towards gray at this point), which will make a big difference. But in the meantime, I decided to jazz up this boring Ikea cabinet.
It went from this (seriously, could this picture be any more boring?)

To this!

Unlike the bathroom trellis wall, it was an easy project and took no time to complete! The cabinet has glass front doorswith panel inserts. One side of the panel is white and the other is black. I could have probably just painted directly on them, but they had a glossy finish and I was worried about paint adhering to them. And I thought it may be a good idea to keep them on hand in case I later changed my mind.
So I went to the art supply store and picked up a couple of thin canvases -- not the ones that are stretched over frames. For two canvases, it was about $14.00. The nice thing about the canvas too is that it will be very easy to paint over the fretwork design if I ever want to change things up.

Here's a shot to give you an idea of the thickness of the canvas. We just used our mat cutter to cut them down to the right size.

The hardest part for me was figuring out the pattern measurements. I spent quite a while growing increasingly frustrated that I couldn't figure it out. It would have been easier if I could have just taped off the design itself and painted the remainder of the space the color. But of course, I wanted the design itself to be painted. Justin wasfinally tired of listening to me complain nice enough to come over and offer his assistance.
In no time, he made his own graph paper and had a template drawn out. Show off.


Then I went around the pencil lines with the tape. Once that was done, I took a kneaded eraser and went over the edge of the tape lines to create a good seal (and to clean up any pencil lines).
To help ensure clean, crisp lines, I used white acrylic to paint over the edge of the tape. That way if any of the paint were to seep under the tape, it would be white and unnoticeable. (Thankfully the white paint I had on hand was an exact match to the canvas.)

After that dried, I did two coats of teal paint.

Then the fun part -- removing the tape! I removed it while the top coat was still wet. Thankfully, it needed only very minor touch ups.

I was so excited to put those puppies in the cabinet. What a difference!

I love how such a simple change makes such a big (and fun) impact in our otherwise boring office.

I am still deciding what I want to put on top of the cabinet. I am thinking some bins for mail sorting and maybe a fun lamp from HomeGoods. Stay tuned for more office updates . . .
It went from this (seriously, could this picture be any more boring?)

To this!

Unlike the bathroom trellis wall, it was an easy project and took no time to complete! The cabinet has glass front doorswith panel inserts. One side of the panel is white and the other is black. I could have probably just painted directly on them, but they had a glossy finish and I was worried about paint adhering to them. And I thought it may be a good idea to keep them on hand in case I later changed my mind.
So I went to the art supply store and picked up a couple of thin canvases -- not the ones that are stretched over frames. For two canvases, it was about $14.00. The nice thing about the canvas too is that it will be very easy to paint over the fretwork design if I ever want to change things up.

Here's a shot to give you an idea of the thickness of the canvas. We just used our mat cutter to cut them down to the right size.

The hardest part for me was figuring out the pattern measurements. I spent quite a while growing increasingly frustrated that I couldn't figure it out. It would have been easier if I could have just taped off the design itself and painted the remainder of the space the color. But of course, I wanted the design itself to be painted. Justin was
In no time, he made his own graph paper and had a template drawn out. Show off.


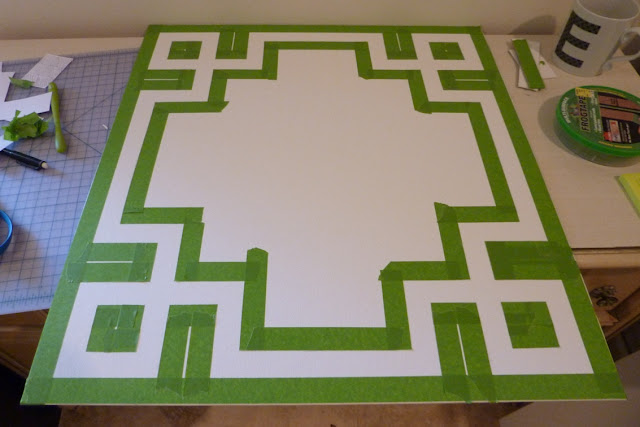
Once the template was cut out, I just traced it on the canvas. I put a border of frog tape around the whole thing so the pattern wouldn't be right on the edge.

Then I went around the pencil lines with the tape. Once that was done, I took a kneaded eraser and went over the edge of the tape lines to create a good seal (and to clean up any pencil lines).

To help ensure clean, crisp lines, I used white acrylic to paint over the edge of the tape. That way if any of the paint were to seep under the tape, it would be white and unnoticeable. (Thankfully the white paint I had on hand was an exact match to the canvas.)

(for those of you who notice every detail in a picture, you may have spotted my newest craigslist find!)
After that dried, I did two coats of teal paint.

Then the fun part -- removing the tape! I removed it while the top coat was still wet. Thankfully, it needed only very minor touch ups.

I was so excited to put those puppies in the cabinet. What a difference!

I love how such a simple change makes such a big (and fun) impact in our otherwise boring office.

I am still deciding what I want to put on top of the cabinet. I am thinking some bins for mail sorting and maybe a fun lamp from HomeGoods. Stay tuned for more office updates . . .


No comments:
Post a Comment