Showing posts with label Do it Yourself. Show all posts

Saturday, April 6, 2013

Sandy Toes

Isnt this a great picture? Someone forwarded it to us, it was a image they found on Pinterest...

What a fun Sandy Toes Beach #DIY Project!

Every Summer in Nantucket by the end of the trip we have a picnic table covered in #beach treasures. I have a feeling there will be lots of sandy toes on the table this summer!

Sunday, May 22, 2011

DIY Goyard Stripe Clutch from American Apparel

While on agirlnamedbong this afternoon I came across this DIY project I have added to my list of have to do's asap!!
                      (American Apparel clutch DIY with Goyard Stripes image from gens favorite.)

Do it yourself steps shown below, from Just B.
What you will need:
A leather pouch...
(These are from American Apparel and they come in three sizes and all different colors... 
Small $48.00 Medium $60.00 Large $80.00)


Acrylic paint in white and the color bright color of your choice
Paint brush, Painters tape, Blow dryer & Acrylic coating spray (shown later) 


Step two: Mark off the area you want to paint with painters tape. If you are a real perfectionist you can measure it out to make sure it is even on both sides or trust your insticts and eye ball it like I did.

Step three: Mix white acrylic paint with a bit of water for first layer to help it adhere to the leather. Start brushing onto leather from tape down to avoid too much leakage under the tape. (As tedious as you can be I'm sorry to say this still happens.)


Step four: After the white dries, bring out the neon guns and do the same without water added. The white acts as a primer so that your color will pop bright against the muted leather. I used a blow dryer during this process because I couldn't take the waiting in between layers to paint. Works miraculously to get an even coat.


Step five: When you're finally satisfied with the painted color cover the non painted leather with paper or cover with a magazine of some sort. Last minute I didn't like the feeling of the rough paint so ran to the craft store for glossy acrylic spray coat. This helps protect the paint from water and wear while also giving it a soft smooth finish like the leather!

Let dry for 2 hours untouched and you're done!

Monday, April 11, 2011

Make your own valance by Nate Berkus & Easy Pelmet Boxes (never heard of a pelemt box? me neither...)


Two great D.I.O projects... 


Make Your Own Valance by Nate Berkus

Get the step-by-step guide to making your own affordable valance, even if you don't sew!

Get the step-by-step guide to making your own affordable valance, even if you don't sew!

What You Need
Wooden Valance
Staple Gun
Batting
Scissors
Fabric
Masking Tape
Acrylic Paint
Stencil brush

Directions

1. Purchase a wooden valance at your local hardware store. Measure the height and length of the valance. When measuring the length, include measurements for the sides as well as the face
2. Add two inches to each of these measurements, and cut batting to these measurements.
3.Wrap the batting around the valance. Using a heavy duty STAPLE GUN, attach batting to valance at the back side. Begin stapling at the center and work toward the ends. At the ends, it may be necessary to trim away some of the bulk created when folding and stapling the batting.


4. Add an inch to your batting measurements to the measurements of your fabric. Cut the fabric to size.


5. Staple the fabric to the valance in much the same way the batting was attached. Gently pull the fabric tight as you work. Turn your work over regularly to make sure there are no creases or puckers.

6. At the fabric ends, create neat "hospital" style corners and staple in place.


7. To create a design or stripe on the fabric valance, layout your pattern using masking tape. Remember that it is the blank area between the lengths of tape which will make up your design.  When you are satisfied with the design, make sure that the edges of the tape are smooth and adhered without gaps to the fabric. In the demonstration, the blue tape represents the area that will be painted, and the white tape is the temporary stencil for the pattern.


8. Use artists' acrylic paint because it's thick and has less tendency to "bleed" under the tape. Dip the stencil brush into the paint. Dab off excess paint, and cover the stenciled area. It is best to apply the first coat of paint very lightly. Be careful not to drip paint on other exposed areas of the valance.
9. After you've completed painting, allow at least an hour dry time. Repeat for a second coat. It may be necessary to apply a third coat.
10. Allow paint to dry entirely before removing the masking tape.

Easy Pelmet Boxes by http://littlegreennotebook.blogspot.com/2009/09/easy-pelmet-boxes.html

Many of you asked about the pink pelmet boxes in my girls' room and I’ve been so excited to share the mini-tutorial! It’s an easy and inexpensive one!


Two of the three windows in the bedroom were obstructed by furniture, so curtain panels (my default window treatment) weren’t really an option. I thought about transforming the mini-blinds into fabric shades, but I was really hoping to find a way to make a structured valence or pelmet box.


In the early planning stages, I was going to buy some plywood at Home Depot and use an electrical saw to cut out a fun design. That was intimidating for me though, and the price of the wood and a new saw (or a carpenter) was going to add up. Then I realized that I didn’t need anything fancy in this room – just something flat that could be cut easily and that was sturdy enough to hold up some batting and fabric.
Enter: foam core board.
I picked up three sheets at Michael’s for $1.99 each. I carefully drew one half of my pelmet shape on to the foam core, cut it out with a box cutter and used that piece as my template. I also cut some short pieces that would be my sides.

I had bought some L-brackets, screws, nuts and washers to assemble the corner pieces, but I ended up just duct taping the whole thing!! This project was SO easy!!

Duct tape holding the two halves together (above) and the side/corner pieces (below)

Then, using ¼” staples and my trusty PowerShot Pro, I upholstered the pelmets with some batting and pink linen left over from a client’s project. I ended up using only about a yard of fabric for all three pelmets.

After stapling, I used Fabri-tac to glue on ¼” navy blue bias tape as a top and bottom border.

I don’t have a photo of this step, but to hang the pelmets, I simply epoxied some wall hangers to the back of the foam core, and hung the boxes on the walls with nails.


And that’s it! It took me about two hours to do this project - from design conception to hanging the three pelmets. So fast and so easy!

Sunday, April 10, 2011

Ikea Cabinet Makeover

Check out this blog post from Emily of name5things.blogspot.com... She made over this Ikea Cabinet and it looks amazing... another great do it yourself project...

name5things.blogspot.com 's Cabinet Makeover: 
(Please note this blog is original contact from name5things.blogspot.com)
Our office is currently a little lot on the bland side to say the least.  I am trying to decide on a paint color for the walls (leaning towards gray at this point), which will make a big difference.  But in the meantime, I decided to jazz up this boring Ikea cabinet. 

It went from this (seriously, could this picture be any more boring?)


To this!


Unlike the bathroom trellis wall, it was an easy project and took no time to complete!  The cabinet has glass front doorswith panel inserts.  One side of the panel is white and the other is black.  I could have probably just painted directly on them, but they had a glossy finish and I was worried about paint adhering to them.  And I thought it may be a good idea to keep them on hand in case I later changed my mind.

So I went to the art supply store and picked up a couple of thin canvases -- not the ones that are stretched over frames.  For two canvases, it was about $14.00.  The nice thing about the canvas too is that it will be very easy to paint over the fretwork design if I ever want to change things up. 


Here's a shot to give you an idea of the thickness of the canvas.  We just used our mat cutter to cut them down to the right size.


The hardest part for me was figuring out the pattern measurements.  I spent quite a while growing increasingly frustrated that I couldn't figure it out.  It would have been easier if I could have just taped off the design itself and painted the remainder of the space the color.  But of course, I wanted the design itself to be painted. Justin was finally tired of listening to me complain nice enough to come over and offer his assistance.

In no time, he made his own graph paper and had a template drawn out.  Show off.


Once the template was cut out, I just traced it on the canvas.  I put a border of frog tape around the whole thing so the pattern wouldn't be right on the edge.   


Then I went around the pencil lines with the tape.  Once that was done, I took a kneaded eraser and went over the edge of the tape lines to create a good seal (and to clean up any pencil lines). 
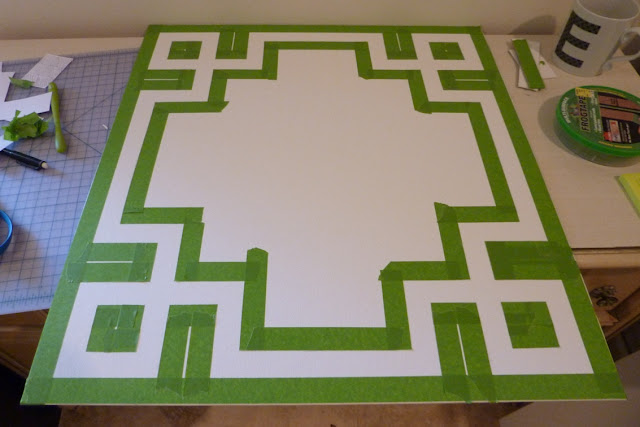


To help ensure clean, crisp lines, I used white acrylic to paint over the edge of the tape.  That way if any of the paint were to seep under the tape, it would be white and unnoticeable.  (Thankfully the white paint I had on hand was an exact match to the canvas.) 

(for those of you who notice every detail in a picture, you may have spotted my newest craigslist find!)

After that dried, I did two coats of teal paint.


Then the fun part -- removing the tape!  I removed it while the top coat was still wet.  Thankfully, it needed only very minor touch ups. 


I was so excited to put those puppies in the cabinet.  What a difference! 


I love how such a simple change makes such a big (and fun) impact in our otherwise boring office.


I am still deciding what I want to put on top of the cabinet.  I am thinking some bins for mail sorting and maybe a fun lamp from HomeGoods.   Stay tuned for more office updates . . .

Sunday, April 3, 2011

Another ikea Do it yourself...

Upholstered Ikea Besta (Not made my be)


Materials: Besta, hammer, upholstery nails, pen, ruler, paper

Description: We used Besta cabinets for this project. 

1. Cut a piece of paper in a pattern that you like and trace it on the doors. 

2. I then marked, with a pencil, where I wanted the nails to be. 


3. Hammer down an upholstery nail on each marking 

4. Enjoy! 


See more of the upholstered Besta as well as her other easy and cheap DIY projects.

Wednesday, March 30, 2011

Ideas for a cheap headboard wall makeover

Apartment Therapy.com

In many homes, the bedroom often gets the least decorative attention even though it's the room where we normally spend the most time. And it's no wonder, bedroom furnishings aren't easy on the wallet. However, if you start with the headboard wall — the focus of the room — and go from there, it's easy to establish a vision and get the creative ideas flowing.


• Gallery Wall. I know there is a hot debate about the safety of using shipping pallets as furniture, so let's not even go there today, but I will say that creating a gallery wall around a simple bed frame — even one with no headboard at all — creates an instant focal point. Pick objects that can be affixed securely to the wall, and if you're in the earthquake zone, skip the suggestion entirely. Make sure that your hanging art is hung high enough that sitting up in bed won't cause an avalanche.
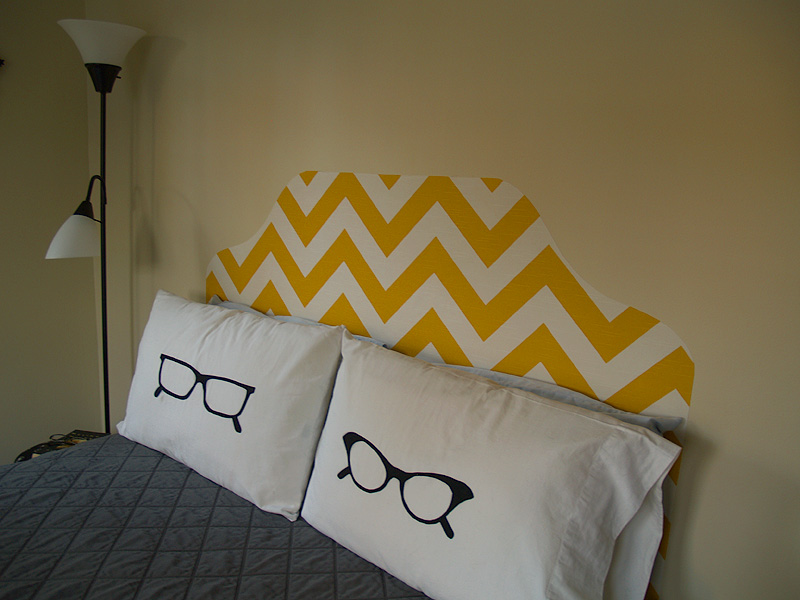
• Painted Headboard. You can be as elaborate (picture 3) or as minimalist as you'd like, but defining your sleep-space with a drawn or painted headboard is the most cost effective way to anchor your bed, especially one lacking in an ornamentation.
• Fabric Headboard. There are several ways to spruce up a bed with fabric, some being more costly and labor intense than others — think queen canopy — but simply hanging a tapestry or yard of fabric behind the bed will anchor the space and give it an instantly "finished" look. Use regular curtain rods or simple dowels and eye-hooks to affix them to the wall, and be creative about where you find your fabric — think table clothes, twin flat sheets, etc.
• Wallpaper and Decal Headboard. The decal craze may have lost some steam in the last few years, but it's still a great alternative for renters, dorm dwellers, or anyone seeking to spruce up a plain-jane frame without breaking the bank. Check out Blik anduppercase living for some great headboard decals, or follow Martha Stewart's instructionsfor creating your own out of wallpaper.
Images&Content: "Ideas&Opintion" apartmenttherap Images: 1: Serena & Lily, 2: via decorpad, 3: Apartment Therapy: Chicago, 4: Homes and Gardens, 5: Southern Accents, 6: Martha Stewart, 7: uppercase living

Cool ideas right? Well... Here is a How to:
All Pics and words by Metelandmud
For this project I used:
- 1 yard of good quality decorator fabric, which I bought at Premier Fabrics in Germantown. I chose Zig Zagin Corn Yellow.
- Stiffen Stuff
- Good fabric scissors
- An iron

Step 1: Cut the selvedge off and square up the fabric. If you have a queen bed, you’re going to want to keep as much of the width as possible, so be sure to cut close to the edge of the selvedge.
Step 2: Iron that puppy to within an inch of its life. Once you start spraying you’re not going to be able to iron it again, so you want to get it as flat as possible now.
Step 3: Fold the fabric in half lengthwise and sketch on the shape of your headboard. Since my fabric is so angular, I decided I wanted the shape to be really fluid and curvy.
Step 4: Cut out your headboard.
Step 5: Lay your headboard, face down, on a flat surface, with a tarp under it to keep your floor or table from getting sticky (I use a shower curtain liner from the $1 store… way cheaper than an actual tarp). I planned on spraying the entire back, but within a few minutes, my fingers were cramping and the spray bottle started sticking. So instead, I opened the bottle, poured a little into a bowl (one I didn’t mind never eating out of again), and brushed it on with an old paintbrush. Try to get at least a little glue on every inch of the fabric, but be SURE to REALLY SOAK the edges. Let it dry overnight.
Step 6: Once your headboard is completely dry, it’s time to place it on the wall. You can use packing or masking tape to temporarily hold it up. Make sure it’s straight before you start ironing!
Step 7: Set your iron to high heat with no steam. I started in the middle, ironing the middle section from top to bottom, then working my way out. Be sure to focus on the outer edge, making sure it is firmly attached all the way around.
And you’re done! I’m really happy with how this project turned out. It really brings life into my bedroom, which has felt pretty lifeless since I moved in. And the best part is that it cost about $9, didn’t take much time, and is completely reversible if I get sick of it!